Thursday, March 21, 2013

Slow Cooker Herb & Lemon Chicken

Last night while laying in bed I decided we needed something new and different for dinner tonight. I am just tired of the same old thing night after night after night. Plus, quite honestly, I'm tired of all 3 of my kiddos hanging around my feet whining and complaining that they are hungry when I brave my way into the kitchen at around 4:30 in the afternoon to work on dinner. Only then to hear them all complain about how they are not eating it because it's not "Hot Dogs and Mac n' Cheese" or "Pancakes and Bacon." It is time for a new game plan. Time to bust out the Slow Cooker. While browsing internet recipe sites last night I ran across an old favorite of mine, Lemon Chicken. Mmmmmm....now that sounds tasty. My parents used to make Baked Lemon Chicken when I was growing up as a child and it was one of my favorites. So, why not? Maybe the kids will like it. Let's give it a try! So I've compiled several Lemon Chicken recipes into one...and I've tossed it all into the slow cooker because, let's face it: the kids are in a much better mood at 10 o'clock in the morning, rather than at 5 in the evening. So let's start off this day on the right foot! 

What You Need:
4-6 Boneless Skinless Chicken Breast Halves 
1 1/2 tsp dried Oregano
1 tsp dried Rosemary
6 Garlic Cloves, minced
1 Tbsp Butter
1 Tbsp Olive Oil
1-2 cups Chicken Broth
Juice from 2 Lemons
Salt & Pepper

Directions: Combine oregano and rosemary is a sandwich bag and use a meat hammer to slightly crumble and break down herbs. Completely thaw and pat dry chicken breasts with paper towels. Sprinkle both sides of chicken with salt & pepper, and oregano and rosemary mixture. 


In a large skillet heat butter and oil over medium heat. Add garlic to skillet and stir once to coat. Immediately add chicken breasts to skillet and brown both sides. Add chicken broth to pan and use a spoon to help release all of the brown bits that may have stuck to the bottom of the pan. 


Transfer entire contents of skillet to slow cooker. Cover and cook on low for 4-6 hours. You're house will smell soo good all-day-long! But, fight the temptation to open the lid and peek. Opening the lid will let the warm steam out and then you'll have to add about 20 minutes on to the cooking time for each time it is opened! I can smell mine cooking right now...and boy is my tummy rumbling!  After 4-6 hours (of torture) pour lemon juice over chicken and continue to cook on low for the last remaining hour. Be careful not to overcook the chicken or it will turn dry and flavorless. 


Remove chicken from slow cooker and skim fat from liquid. Serve juice over chicken. Serve with fresh steamed broccoli drizzled with fresh lemon juice, a fresh oven roasted vegetable medley, garlic & herb oven roasted potatoes, brown rice, and/or a tangy mixed green salad. Enjoy!


______________________________________________________________________

Here's a look at what we served with our Herb & Lemon Chicken!


Baby Portabella Mushrooms, Red Bell Pepper & Yellow Bell Pepper tossed with one minced bulb of garlic, oregano, rosemary and olive oil. Baked in a 400 degree oven for an hour. 

Wednesday, March 20, 2013

Hatching Chicks Deviled Eggs

Easter is almost here...next week! And while my families main focus is looking to the Cross and Jesus' Resurrection, these cute Hatching Chick Deviled Eggs are sure to be a hit at your Easter Dinner gathering! 


What You Need: 

12 Hard Boiled Eggs (sliced at 2/3 or 1/3)
Your Favorite Deviled Egg Filling Recipe
12 Parsley Leaves
24 Capers
12 Round Carrot Slices (pictured) 
12 Carrot Beaks (pictured)

Notice the chick "toes" cut into the carrot rounds above. 
The carrot beaks are essentially rectangles with small triangles cut out of them for the mouth.


For transport and serving purposes I used a mini cupcake pan with mini cupcake liners. 

Directions: Cut each hard boiled egg about 2/3 of the way up the egg to represent the body of the chick. The remaining 1/3 with be the top or hat of the chick. Place the carrot round with toes cut out in each mini cupcake liner and place large egg white on top. Use a piping bag (or a sandwich bag with corner snipped) to fill the larger bottom half of the egg white with your favorite deviled egg filling. Here is the recipe I like to use: 

Deviled Egg Recipe

12 Hardboiled Egg Yolks
1/2 cup Mayonnaise
2 Tbsp Milk
1 tsp dried Parsley Flakes
1/2 tsp dried Chives
1/2 tsp ground Mustard Powder
1/4 tsp dried Dill Weed
1/4 tsp Salt
1/4 tsp Paprika
1/8 tsp ground Black Pepper 
1/8 tsp Garlic Powder

Mash yolks with a fork leaving no lumps. Add remaining ingredients and mix well. Make sure to allow mixture to be refrigerated at least 5 hours prior to serving. 
________________________________________________________

Once large egg white is filled, place the remaining smaller egg white on top but slightly offset toward the back of the egg so that it will open up space for a face. Place two capers for the eyes and carrot rectangle with triangle cut out for the nose, as pictured. Cut a small slit in the top egg white and insert the parsley leaf to mimic the Chick Comb


I find it easiest just to assemble as I go as you can see above. 

And there you have it. A whole army of Hatching Chick Deviled Eggs to share with your friends and family! 


It is best to make these the day before your event and refrigerate them, so the flavors have plenty of time to meld. 

Double, Triple or Quadruple the recipe for as many Hatching Chick Deviled Eggs as you need! 
This recipe makes one dozen. 


Feeding Tube Awareness 2013


Our family and youngest daughter, Trinity was recently featured in a local newspaper 
about her journey and life with a feeding tube. 

You can read the article promoting Feeding Tube Awareness on the Kearney Courier Website!


This article was written to promote community awareness about Feeding Tube Awareness Week which was 
February 10 - 16, 2013. You can find more helpful information about feeding tubes on the 

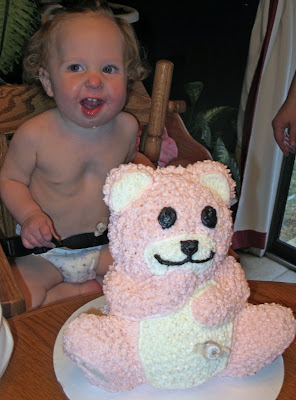
Tubie Bear Birthday Cake

I made this special 3D Tubie Bear Birthday Cake for my daughter, Trinity's 1st Birthday Party. She has been feeding tube fed since birth, and has a low profile gastrostomy MIC-KEY feeding tube (or g-tube) just like the one we used on this Tubie Bear since she was 6 weeks old.

Since there is soo much focus on food and eating at parties and gatherings and birthday's we thought it would be extra special if Trinity's Birthday Cake somehow incorporated her "special" way of "eating." And that is how this idea started. Making this cake was really quite simple. You can find this Wilton Stand-Up Cuddly Bear Pan for purchase on Wilton.com or at many craft stores for about $30.00. You will need 1 regular boxed cake mix AND 1 boxed pound cake mix, mixed together according to the packages directions. It takes about 6 2/3 cups of cake batter to make this cake. Preheat oven to 350 degrees and grease and flour all surfaces of pan that cake might touch, including inside and outside of heating core. Fasten halves of pan together using clips and pour 6 cups of batter into pan. Insert heating core and fill with 2/3 cup of cake batter. Bake upside down in oven on a baking sheet for about 50-60 minutes or until toothpick inserted into batter in heating core comes out clean. Remove from oven and allow to cool in pan for 10 minutes, trimming excess cake from outside. Remove face side of pan and allow to cool for 15 minutes while laying on back. Reinsert face side of pan and all to cool while laying on face for an additional 15 minutes. Remove entire pan and allow to finish cooling completely. Once cake is completely cooled, you are ready to decorate! I make my own icing, but I'm sure you could use a couple of jars of store bought and it would turn out just as nice. This is the recipe that I use for icing and I double it to make enough for this bear cake.

Buttercream Icing
1/2 cup Vegetable Shortening
1/2 cup Butter
1 tsp clear Vanilla
1 lb Powdered Sugar
2 Tbsp Milk

Directions: Cream together shortening and butter in mixer. Add vanilla. Gradually add in sugar, beating well on medium speed. Scrape bottom and sides often. When all sugar is mixed in the icing will seem dry. Add milk and beat at medium speed until light and fluffy. Keep bowl covered and refrigerate until ready to use.

The next step is to plan how you want to decorate your bear and dye your white icing accordingly. I decided to do a pink bear since the cake was for my daughter and it would match her pink outfit. At one point we almost did a brown bear just using Chocolate Icing, but in the end we opted for pink because it was light and bright. I then just used a star icing tip (#16) and "starred" the entire bear. When I was finished I outlined the major sections with a thin line using round tip #4. I also used the same round tip to add the eyes, nose and mouth. Once you have it all decorated with icing the last step is to place it's g-tube...and voila! 
Easy as that! 

The cake was a huge hit and Trinity loved it, of course! She honestly couldn't wait to get her hands on it!