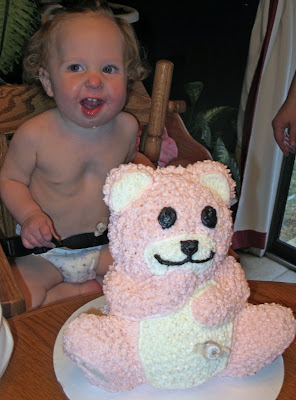
I made this special 3D Tubie Bear Birthday Cake for my daughter, Trinity's 1st Birthday Party. She has been feeding tube fed since birth, and has a low profile gastrostomy MIC-KEY feeding tube (or g-tube) just like the one we used on this Tubie Bear since she was 6 weeks old.
Since there is soo much focus on food and eating at parties and gatherings and birthday's we thought it would be extra special if Trinity's Birthday Cake somehow incorporated her "special" way of "eating." And that is how this idea started.
Making this cake was really quite simple. You can find this Wilton Stand-Up Cuddly Bear Pan for purchase on Wilton.com or at many craft stores for about $30.00. You will need 1 regular boxed cake mix AND 1 boxed pound cake mix, mixed together according to the packages directions. It takes about 6 2/3 cups of cake batter to make this cake. Preheat oven to 350 degrees and grease and flour all surfaces of pan that cake might touch, including inside and outside of heating core. Fasten halves of pan together using clips and pour 6 cups of batter into pan. Insert heating core and fill with 2/3 cup of cake batter. Bake upside down in oven on a baking sheet for about 50-60 minutes or until toothpick inserted into batter in heating core comes out clean. Remove from oven and allow to cool in pan for 10 minutes, trimming excess cake from outside. Remove face side of pan and allow to cool for 15 minutes while laying on back. Reinsert face side of pan and all to cool while laying on face for an additional 15 minutes. Remove entire pan and allow to finish cooling completely. Once cake is completely cooled, you are ready to decorate! I make my own icing, but I'm sure you could use a couple of jars of store bought and it would turn out just as nice. This is the recipe that I use for icing and I double it to make enough for this bear cake.
Buttercream Icing
1/2 cup Vegetable Shortening
1/2 cup Butter
1 tsp clear Vanilla
1 lb Powdered Sugar
2 Tbsp Milk
Directions: Cream together shortening and butter in mixer. Add vanilla. Gradually add in sugar, beating well on medium speed. Scrape bottom and sides often. When all sugar is mixed in the icing will seem dry. Add milk and beat at medium speed until light and fluffy. Keep bowl covered and refrigerate until ready to use.
The next step is to plan how you want to decorate your bear and dye your white icing accordingly. I decided to do a pink bear since the cake was for my daughter and it would match her pink outfit. At one point we almost did a brown bear just using Chocolate Icing, but in the end we opted for pink because it was light and bright. I then just used a star icing tip (#16) and "starred" the entire bear. When I was finished I outlined the major sections with a thin line using round tip #4. I also used the same round tip to add the eyes, nose and mouth. Once you have it all decorated with icing the last step is to place it's g-tube...and voila!
Easy as that!
Easy as that!


No comments:
Post a Comment